Sunday, 22 December 2013

Error: MIXED_DML_OPERATION


Few days back while writting an test class I encounterd an Error stating 

System.DmlException: Insert failed. First exception on row 0; first error: MIXED_DML_OPERATION, DML operation on setup object is not permitted after you have updated a non-setup object (or vice versa):  

You will get this Error if you are trying to perform DML on setup and non-setup objects in same Transaction. 

Non-Setup objects can be any one of the Standard objects like Account or any Custom objcets,

Below are few examples of Setup objects

1.  FieldPermissions
2.  Group
You can only insert and update a group in transaction with   other SObject. Other DML operations are not allowed.
 
3.  GroupMember
You can only insert and update a group member in a transaction with other sObjects in Apex Code saved using Salesforce.com API version 14.0 and earlier.
 
4.  ObjectPermissions
5.  PermissionSet
6.  PermissionSetAssignment
7.  QueueSObject
8.  SetupEntityAccess
9.  User
  • You can insert a User in a transaction with other sObjects in  Apex code saved using Salesforce.com API version 14.0 and earlier.
  • You can insert a user in a transaction with other sObjects in Apex code saved using Salesforce.com API version 15.0 and later if UserRoleId is specified as null.
  • You can update a user in a transaction with other sObjects in Apex code saved using Salesforce.com API version 14.0 and earlier
  • You can update a user in a transaction with other sObjects in Apex code saved using Salesforce.com API version 15.0 and later if the following fields are not also updated:
    a. UserRoleId
    b. IsActive
    c. ForecastEnabled
    d. IsPortalEnabled
    e. Username
    f. ProfileId 


10. UserRole
11. UserTerritory
12. Custom Setting in Apex code saved using Salesforce.com API version 17.0 and earlier. 
 
Salesforce says:
DML operations on certain sObjects can’t be mixed with other sObjects in the same transaction. This is because some sObjects affect the user’s access to records in the organization. These types of sObjects must be inserted or updated in a different transaction to prevent operations from happening with incorrect access level permissions. For example, you can’t update an account and a user role in a single transaction. However, there are no restrictions on delete DML operations.


This error typically encountered in two types of Scenerio.
1. Non-Test Code
2. Test Code


1. Non-Test Code

Let us suppose I want to write a Trigger on Account Insert and this trigger will then create a Group and add current User as member to that newly created Group.


 NOTE : Version of Trigger is 29.0

Now when tried to create a new Account You would get an error 


[ BEFORE MOVING FURTHER LETS JUST WAIT FOR A SEC, AS TRIGGER VERSION IS SET To 29, LET SEE WHAT WILL HAPPEN IF VERSION OF TRIGGER IS CHANGED TO VERSION 14, AND REMOVE "doesIncludeBosses " attribute from Account Trigger WHILE CREATING GROUP AS IT WILL THROW AN ERROR. NOW SAVE TRIGGER AND TRY TO CREATE ACCOUN, YOU WON'T GET THE SAME ERROR. REFER SETUP OBJECT LIST ABOVE POINT 3(GroupMember)  ]

SOLUTION IS Simple, we can split the DML into future and non future context i.e.
1. Perform DML on Non-Setup object type
2. Perform DML on Setup object type in @future methods.

or vice-versa
 
AccountInsertTrigger.trigger


 AccountHandler.cls


2. Test-Code

Now lets take a scenerio where you have test above Trigger

while executing this test class we will receive Error


This problem can be fixed by starting new context in the future method.
Do these changes in AccountHandler.cls


now run the test class

this will work for both UI and Test code


References :


Wednesday, 11 December 2013

Salesforce Public Calendar and Resource

In salesforce we can create an event and that event get displayed on salesforce calendar but what will happen when you want to block an event in some conference room and do not want that conference room should get block by another event on same day and at same time.
             We can acheive that using salesforce resource which is actually a very little but useful functionality of Salesforce which is always been overlooked. Using this functionality we can manage office resource, projectors, meetings etc.

As according to Salesforce : 

"In contrast to users’ individual calendars, public and resource calendars are for managing group activities or shared resources. You can create an unlimited number of calendars."

To add public calendar or resource :

1. Go to Setup > Customize > Activities > Public Calendar and     Resources.

2. Either create new Public Calendar or Resources.

3. Give a Name and check Active checkbox.

4. Save it.


 You can also set up sharing setting for Public Calendar and sharing setting by clicking sharing button 


Now we have sucessfully added the Resource now we can use this while creating an Event.

1. Go to Event Creation page.

2. Scroll to bottom of the page there is a button call "Add Invitees ".


3.  Click Add Invitees, a window will open which will give you option to select the public calendar, resource.


4. In Event drop down list select Resource.

5. Select Resource and click insert Selected and click on Done.

6. On click of Done that Resource appears in the list.\

7. Follow same step to invite User, Contact, Leads. 

8. Now save that Event.

9. Now try to create another Event in same time slot on same day for same resource, salesforce wont allow you to same the event and throws an error.


NOTE: You can also view on the events and appointment of the public calendar and resources in a calendar view. Go to your Salesforce calendar, click on the change button beside the little house icon at the top of your calendar. In the Search Within dropdown, select Public Calendars and Resources and you will be able to select the calendar that you want to see. Useful and easy!


Calculate number of years in formula field

If you want to calculate number of years between two dates like calculating someone's age in years from his/her birthdate, you can do it using formula field.

 Create a formula field and select return type a number, don't forget to select decimal place to 0. Now in Formula field editor write below formula.


 Explaination:

IF condition first checks if month of present year is greater than date of birth, if condition is true then age will be calculated as the difference between present year and year of birth, but if condition is false then second IF condition is calculated according to which if month of two dates are same or taday's day is larger than or equal to the day of date of birth then age is calculated as in the first scenario [ YEAR(TODAY()) - YEAR(TODAY()) ]. If these also fail then age is calculated as the difference between present year and year of birth, subtracting 1 
[ YEAR(TODAY()) - YEAR(DOB__c) -1 ].

Monday, 9 December 2013

Email and Phone Validation

Suppose you have created a picklist named Type where you are giving an option of selecting Email or Phone and entering the value in text field and want to validate that text field depending on the value of value selected in picklist.

You can achieve this by creating a simple validation rule

You have Two fields
  1. Type : Picklist value with values
  • Business Email Address
  • Private Email Address
  • Home Phone
  • Mobile Phone
  • Work Phone 
  2. Value : Text Field

All you have to do is to create a validation rule on Value


function used:

IF(logical_test, value_if_true, value_if_false): 
Checks whether a condition is true, and returns one value if TRUE and another value if FALSE.

ISPICKVAL(picklist_field, text_literal) :
Checks whether the value of a picklist field is equal to a string literal

REGEX(Text, RegEx_Text) :
Returns TRUE if Text matches the regular expression RegEx_Text. Otherwise, it returns FALSE.

NOT(logical) :
Changes FALSE to TRUE or TRUE to FALSE

Now i have used
ISPICKVAL(Type__c, 'Business Email Address') || ISPICKVAL(Type__c, 'Private Email Address')

which means picklist value selected is 'Business Email Address' OR 'Private Email Address'

if above statement( ISPICKVAL(Type__c, 'Business Email Address') || ISPICKVAL(Type__c, 'Private Email Address') ) is true then 

Not(REGEX( Value__c , "[a-zA-Z0-9._%+-]+@[a-zA-Z0-9.-]+\\.[a-zA-Z]{2,7}"))
 
will execute which will check for correct email format, if format not matched then it will throw custom error message.

but if statement( ISPICKVAL(Type__c, 'Business Email Address') || ISPICKVAL(Type__c, 'Private Email Address') ) is false 
then 
Not(REGEX( Value__c , "[0-9]{2,5}")
will execute which will check the number/phone format


Note: can change the length by changing the value in curly braces
eg Not(REGEX( Value__c , "[0-9]{2,5}")
will check for length 2 to 5

eg Not(REGEX( Value__c , "[0-9]{2,7}")
will check for length minimum 2 to maximum 7  

Wednesday, 27 November 2013

Randomly Generate Html Color

Are you fed up of copying Hex color code and changing it again and again and do you want to Generate Html Color code randomly, you can acheive this using following javascript code.

<script>
    function get_random_color() {
        var letters = '0123456789ABCDEF'.split('');
        var color = '#';
        for (var i = 0; i < 6; i++ ) {
            color += letters[Math.round(Math.random() * 15)];
        }
        document.getElementById("in").setAttribute('style','background-color:' +color);
    }

</script>

I am generating the color randomly on click of button.

<div id="d">
  <input type="text" id="in"/>
  <input type="button" onClick="get_random_color();" value="generate"/>

</div>


Tuesday, 26 November 2013

Style your Button

Fed up with your look and feel of your old buttons and wanted to add more appeal to your html button
then I will show you the way to get rid of that old boring style button.


In your Input button
<input type="button" value="Button" id="btn" />

You just have add this CSS:


and you will get a new Stylish button, modified it further as you want.


Monday, 25 November 2013

How to Use vLookup in Excel

Many Times I find people struggling to use vLookup in excel as they find it difficult. So today I will tell you how can you use vLookup in Excel and for demo we will be using vlookup for two different Excel sheets.

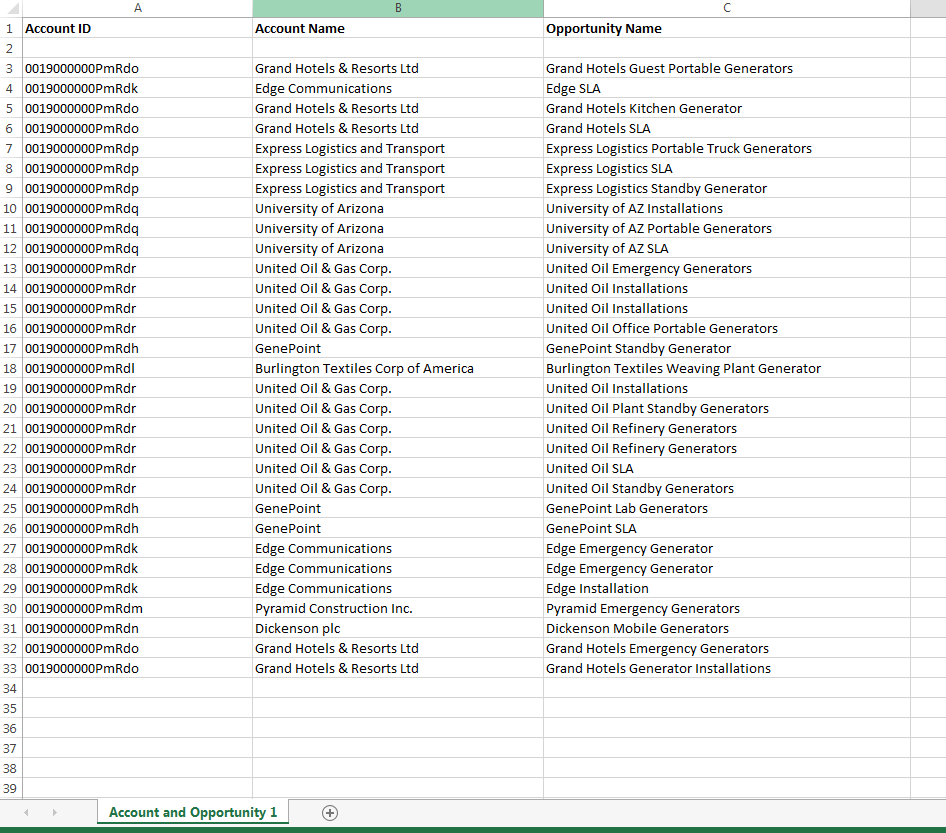
I have created two reports
1. Account with Contacts
(Account and Contact.csv)


2. Account with Opportunity
(Account and Opportunity.csv)


and export them.

We will use vLookup function to get Account Name From Sheet 2(" Account and Opportunity") to Sheet 1(" Account and Contact")

Step 1.write =vlookup( in a cell where you want to find out the value. 
You can also try this with clicking fx present.

Step 2. Click on cell A3 as we want to find out the Account name for that cell.On clicking you will see 'A3' automatically populated inside vlookup() function.


Step 3. Now go to second sheet and select the columns where you want to search the Account name for that particular Id. You will see the vlookup get automatically updated with the columns range.


Step 4. Your vlookup looks like
=vlookup(A3,'[Account and Opportunity 1.csv]Account and Opportunity 1'!$A$1:$C$33,
add the columns number where Account Name is, in our case Account number is at Column 2 in sheet 2.

Step 5. Now put 0 as fourth and final argument and close the vlookup function. Your vlookup will look like
 
=vlookup(A3,'[Account and Opportunity .csv]Account and Opportunity 1'!$A$1:$C$33,2,0)
 
now on click of enter Account Name will appears.